
(L) DIYrotate versus (R) rotating frame footage. Both approaches enable observing fluid motions in a rotating tank with similar granularity!
Visit https://diyrot.epss.ucla.edu/ to use DIYrotate!
DIYrotate is a web app for digitally rotating movies. Given footage of a rotating tank from above, the program can identify the tank and rotate it about its center per a specified rate. DIYrotate is easy to use with no sign up required — simply input your movie and parameters then download the result!
Goal: Enable users to clearly and conveniently observe fluid motions in a rotating tank
Rotating tank platforms are straightforward and insightful models for studying geophysical fluid dynamics. The systems capture the fundamental attributes of Earth’s (and other planet’s) atmospheres, oceans and interiors — the water and rotation represent a planet’s fluid bodies and rotation respectively. Fluid motions in the rotating tank are governed by the same fluid dynamics as counterparts in the real world. Thus, our goal is to observe the fluid motions to develop an intuition behind the forces responsible for our weather, ocean currents, magnetic field and more! There are two traditional approaches:
Note that we are generally interested in observing fluid motions in a rotating tank from above. Rotation aligns fluid bodies with its axis and thus, for many experiments, the surface of the water expresses the key fluid dynamics of the system.
Approach 1: Capture footage in the stationary frame
The stationary frame refers to the view of a camera fixed as the tank rotates — this is analogous to a spacecraft observing a planet from afar. The filming setup is flexible — the camera is supported above the tank by a point outside the system. The mount can be jerry rigged with basic requirements (suspend camera) and few constraints (can be heavy or light and large or small). However, results are difficult to interpret because fluid motions are coupled with rotation.
Approach 2: Capture footage in the rotating frame
The rotating frame refers to the view of a camera rotating in sync with the tank — this is analogous to a person observing a planet from its poles. The filming setup is subject to constraints — the camera is supported above the tank by a point within the system. The camera and its mount must not hinder the tank’s rotation leading to limits on size and weight. Nevertheless, results are ideal for analysis because rotating the camera in sync with the tank abstracts away rotation thus yielding fluid motions themselves.


(L) Stationary frame filming setup — a camera is fixed above the tank as it
rotates. The camera is supported by a point outside of the system. Subject to
few constraints, its mount can be put together with household items. If desired,
larger cameras like DSLRs can be safely attached with sufficient reinforcement
to mitigate fears of falling in water.
(R) Rotating frame filming setup — a camera is rotating in sync with the tank.
The camera is supported by a point within the system. Its mount is constained by
size and weight to enable the tank to continue rotating unhindered. Attaching
larger cameras like DSLRs are a risky proposition without the luxury of added
support. Meanwhile, the camera mount can interfere with during experiments as
users must perform necessary steps (e.g. adding food coloring) whilst avoiding
the structure.


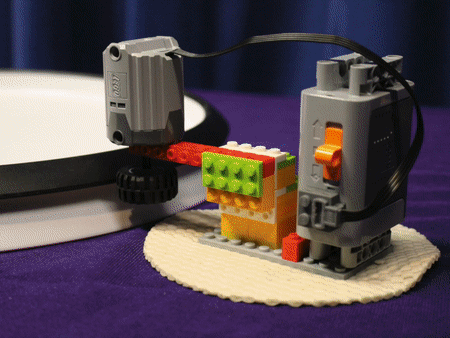
(L) Stationary frame footage — difficult to discern fluid motions in the rotating tank. The fluid motion is coupled with the impact of rotation thus obscuring dynamic structures formed during experiments. (R) Rotating frame footage — fluid motions in the rotating tank are apparent. The impact of rotation has been abstracted away yielding fluid motions themselves. Note that Ω indicates the rotation direction.
To this end, capturing footage in the rotating frame is the go-to option when recording experiments for analysis. Studying fluid motions of the system from an inside perspective removes the impact of rotation and provides an intuitive view of phenomena — analogous to the camera, we (humans) are situated in the rotating frame of Earth. However, the filming setup may require additional thought. The rotating frame offers clear results and the stationary frame offers convenient setup — what if we can combine the best of both worlds? We introduce a new approach:
Approach 3: Obtain rotating frame results from stationary frame footage
DIYrotate fills this role! Use DIYrotate to digitally rotate stationary frame footage in the direction and magnitude opposite of the system’s rotation — we call this process de-rotation. This serves to cancel out and abstract away rotation leaving behind fluid motions themselves. By de-rotating the stationary frame footage, DIYrotate programatically yields results equivalent to rotating frame footage yet with fewer setup constraints to consider.
How to use DIYrotate
DIYrotate can be accessed at https://diyrot.epss.ucla.edu/. The web app features instructions guiding users through de-rotation step by step. Screenshots of the app and a fully textual guide follow below.
If you wish to follow along, click here to download the example video we used. The RPM of this video is 13.45.
Step 0: Capture stationary frame footage
 an exemplary first frame of stationary footage.
For best results from the app, ensure that:
- Lights are not reflecting on the surface of the water. Reflections from the
stationary frame yield artifacts in rotating frame results.
- Both the tank and camera are level. DIYrotate assumes that stationary frame
footage is taken from directly above. Deviations from level can introduce
distortions during de-rotation.
- The tank encompasses the majority of the camera’s view.
- (Optional) Ensure nothing is obstructing the tank rim during the first few
seconds of the video. This is important for DIYrotate to automatically
detect the tank rim. If DIYrotate cannot find the rim, it will prompt you to
manually select it.
Step 1: Upload stationary frame footage to DIYrotate
 a view of the webpage just as it completes uploading your video to the server.
In the following order:
1. Specify the rotations per minute (RPM) of the rotating surface. Positive and
negative de-rotation rates will counteract counterclockwise and clockwise
system rotation respectively. Non-integer values are allowed!
2. (Optional) if you wish to see the original and derotated frame side by side,
check the check box. Note: when using this mode, the rough preview will only
have the derotated frame. The fully processed video will show both frames.
3. Pick the video file you wish to upload. The program will automatically start
uploading your video.
note: when using Safari, very large files (>100MB) may cause the web page to reload, with an error near the top of the page saying “This webpage is using significant memory.” If this occurs, we recommend users try Firefox or Chrome.
Notes for high-speed cameras (slow motion video)
If you captured your video using a high-speed camera or the “slow motion”
feature on your smartphone, some extra work is required to use DIYrotate. You
should find the recording fps and the output fps of your video, and
convert your input RPM as such:
inputRPM = tableRPM * (output_fps / recording_fps)
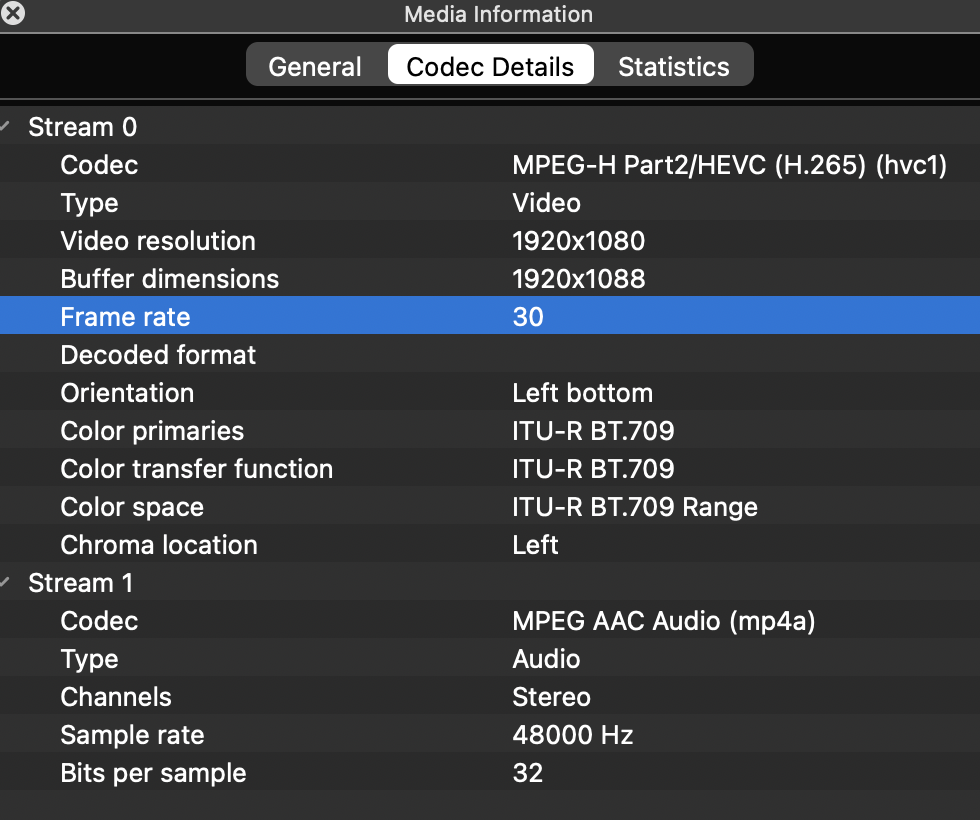
Recording fps can often be found in your camera settings. Here are mine on
iPhone, which I found by going to Settings > Camera > Record Slo-mo:

Output fps is usually 30. To double check, open the slow motion video in VLC and look for “Media Information” under “Window” or “Tools” in the menu bar. Click the “Codec” tab, and round whatever frame rate is displayed to the closest integer.
This is necessary because DIYrotate has no conception of time beyond frames per second of the video. If a video reports it has 30 fps (which is what output fps is), DIYrotate will treat each frame as 1/30th of a second. Slow motion cameras record at higher frame rates such as 120 fps and export the video at 30 fps, effectively slowing motion by 0.25x. DIYrotate has no way of telling between the two, so manual intervention is required.
Step 2: Review Generated Preview
 the webpage asking the user to inspect a generated preview.
- The app should now generate a preview of what the first ten seconds of derotated video should look like.
- Inspect this clip; if it is unsatisfactory, click ‘Adjust’ to manually set the derotation circle (see Step 2.1), and then click ‘Regenerate Preview’ to generate another preview.
- Once the preview looks as you’d expect, click ‘Derotate’ to request a full derotation from the server.
Step 2.1: Manually set derotation circle
 view of manual mode, with the auto-detected circle shown in red.
After the upload is complete, it is possible that DIYrotate cannot detect the rim of the tank in your video. To fix this, click the ‘Adjust’ button, then specify the radius of the circle by drawing from the center of the tank to the side, using your mouse or touchscreen. You can adjust the center of the circle after drawing it by dragging on the circumference of the circle. If you need to redraw, click/tap anywhere not on the circumference to remove the circle, then repeat the above.

view of manual mode, with a redrawn circle offset from the actual tank.
note: during actual usage, try to match the circle with tank rim as much as possible,
as in the previous image.
Steps 3 and 4: Wait, and then download derotated footage from DIYrotate!
 the webpage also asks you to be patient with larger videos.
Please hang tight! Depending on server load and file size, videos may take up to 5 minutes to finish processing, and the browser page will check for updates ever 10 seconds or so. If you accidently close the browser page, going back to diyrot.epss.ucla.edu may recover your derotation progress.


(L) DIYrotate input (stationary frame footage) versus (R) DIYrotate output (programatically created rotating frame footage). Note that the impact of rotation has been removed!
For a detailed version of the instructions and to see more results, watch the following video for a comprehensive overview of DIYrotate!
Other rotating videos to try:
Check out the code for DIYrotate
DIYrotate is an open source project available on GitHub!
DIYrotate (web app) https://github.com/DIYnamics/diyrot
The web app version of DIYrotate is described above. This program is ideal for de-rotating stationary frame footage with no installation required.
DIYrotate (local) https://github.com/DIYnamics/DIYrotate
The local version of DIYrotate enables users to de-rotate stationary frame footage similar to its web app counterpart. This program offers a multitude of options providing fine grained control over results. The local version of DIYrotate is launched from the Terminal and features a GUI for user input — more details can be found on the GitHub repository.